


 This ShopNotes Classic article originally appeared in isue 52 of ShopNotes.
One of the things I like about old hand saws is the decorative carving on many of the handles. So when I was making the saw handle shown on page 24, I couldn’t resist trying my hand at a little carving.
Wheat Pattern. As you can see in the photo above, I carved a simple design in the glued up blank of the saw handle — a traditional wheat pattern. The stems of the wheat are formed by sweeping curved lines, and the kernels are made by cutting small, almond-shaped pockets.
Chip Carving. This type of carving is called chip carving. That’s because the pattern is produced by removing tiny chips of wood. If you’ve never done any chip carving, it’s easy. All it takes is a single, short-bladed knife and a little practice.
Each chip is formed by making two slicing cuts. You just plunge the knife into the workpiece and draw it toward you to sever the wood fibers on one side. Then repeat the process on the other side to lift out the chip.
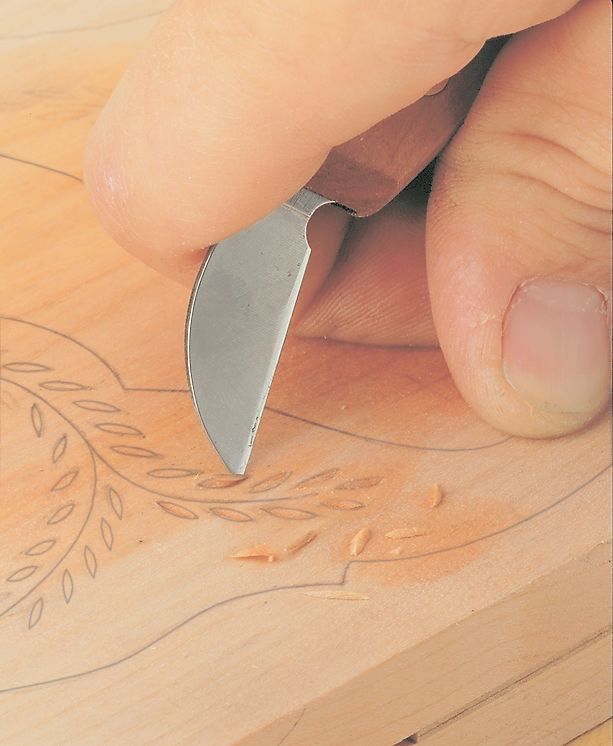
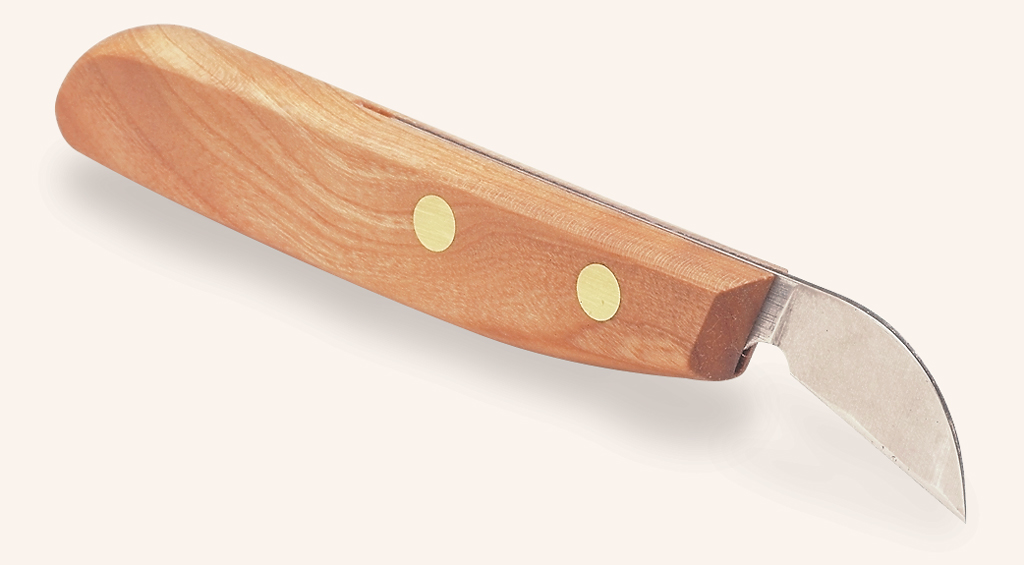 This short-bladed knife is all it takes to chip carve a simple wheat pattern. (Refer to page 31 for sources.)
Carving Knife. The carving knife I use (shown abave) has a short, stiff blade. This makes it easy to manipulate the knife. Plus the blade doesn’t bend or flex when carving the chips. To produce crisp, clean details, the cutting edge of the knife has to be razor shape. The nice thing about the blade on this knife is it’s made of high-quality steel that takes a keen edge. (To learn how to sharpen the knife, go to the end of this post.)
Wood Selection. After you’ve sharpened the knife, it’s a good idea to practice on some scrap pieces of wood before carving the saw handle. Typically, a softwood like basswood is used for chip carving. But basswood is too soft for a saw handle. So it’s best to practice the carving techniques in the same type of wood that you plan to use for the handle. (I made the handle out of cherry.)
Transfer Pattern. Regardless of the type of wood you use, you’ll have to transfer the wheat pattern to the upper blank used to make the handle. For a simple way to do this, see the information below.
Transferring the Pattern
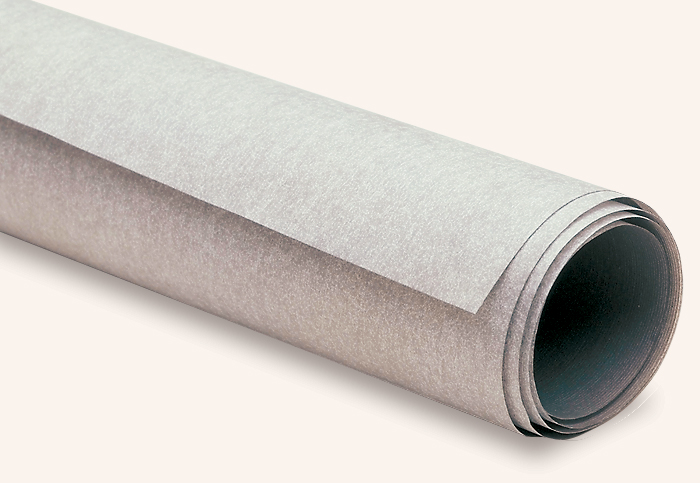 One of the easiest ways to transfer a pattern to a workpiece is to use a tissue-thin paper called transfer paper (shown above).
Transfer paper works like carbon paper, only better. Instead of leaving a waxy, greasy residue, it leaves “dry” lines that are easy to erase.
To transfer the wheat pattern for this carving, first tape a full-size photocopy of it to the upper blank for the handle. Note: The pattern is shown on page 25. Then slip the transfer paper between the pattern and the wood with the dark side down. (See photo below.)
One of the easiest ways to transfer a pattern to a workpiece is to use a tissue-thin paper called transfer paper (shown above).
Transfer paper works like carbon paper, only better. Instead of leaving a waxy, greasy residue, it leaves “dry” lines that are easy to erase.
To transfer the wheat pattern for this carving, first tape a full-size photocopy of it to the upper blank for the handle. Note: The pattern is shown on page 25. Then slip the transfer paper between the pattern and the wood with the dark side down. (See photo below.)
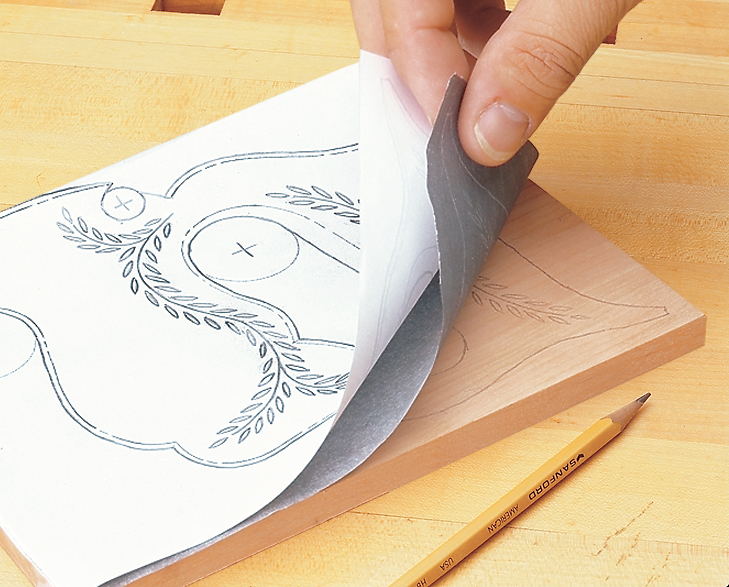 Now simply trace the pattern with a pencil. The transfer paper leaves a light line wherever you push down with a pencil. (Transfer paper is available from many art stores or from the source listed on page 31.)
Get a Grip. One of the secrets to mastering chip carving is learning how to hold the knife. As you can see in photo ‘A’ below, the idea is to place the knife (cutting edge up) in your hand so it’s resting at the base of your fingers. Then wrap your fingers around the handle. Pay special attention to the position of the first joint of your thumb. To provide support as you make a cut, it should be even with the blade end of the handle (Photo ‘B’below).
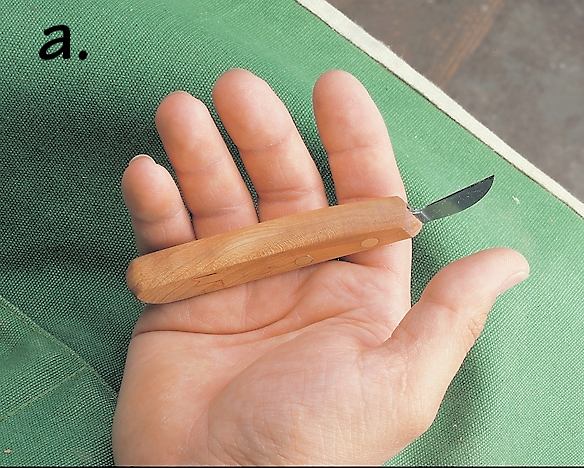
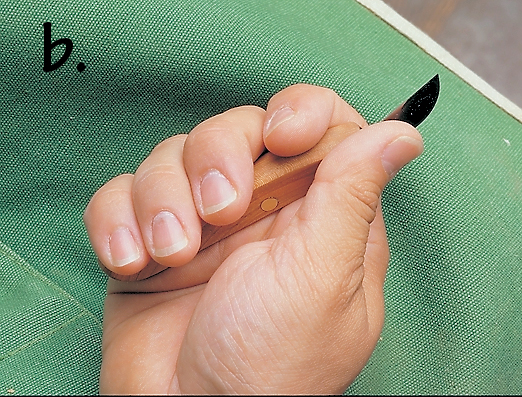 After placing the carving knife in your hand (top), wrap your fingers around it and hold your thumb against the handle (bottom).
Tripod. But your thumb only offers one point of support. The goal is to form a stable tripod by creating three separate points of contact with the workpiece.
To do this, turn the inside of your wrist toward your body. Then rest the tip of your thumb, the knuckle of your index finger, and the point of the blade on the workpiece. This may feel awkward at first, but with practice, it will begin to feel more comfortable. In any case, it’s important to stick with it.
Cutting Angle – That’s because in this position, the blade is tilted at about a 65° angle to the workpiece, and this is the basic cutting angle for chip carving. Shop Tip: You may want to use a scrap block as a guide to check the angle occasionally, as shown in the photo below.
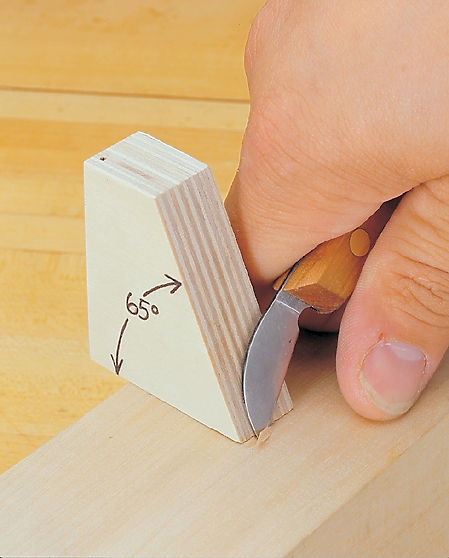 A scrap block cut to a 65° angle provides a handy reminder of the correct cutting angle of the blade.
Practice Cuts. Now you’re ready to make a few practice cuts. The kernels of wheat are the easiest part of the pattern to carve. So draw a few kernels on a scrap piece and try them first. Shop Tip: To make it easier to carve hardwood, it’s a good idea to “soften” the wood fibers. (See photo below.)
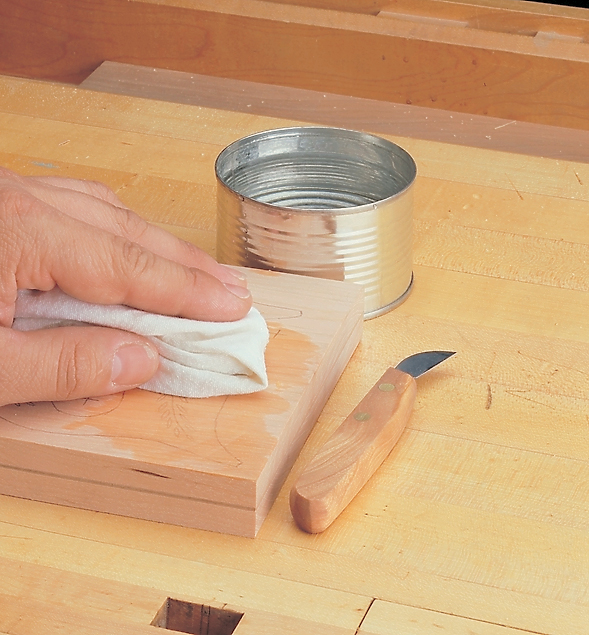 To make it easier to carve hardwood, dampen the surface with water to soften the wood fibers.
There’s no need to clamp the workpiece to a bench, and it doesn’t even have to be held flat. In fact, I hold it in my lap like a notebook. This makes it easy to shift the piece around to find a more comfortable position or work in a tight spot.
To carve each chip, start by setting the tip of the blade at one end of a kernel. Then poke the blade into the wood and pull the knife toward you, as shown in Figure 1. It’s tempting to draw the blade toward your thumb as if you’re peeling potatoes. But ideally, your hand and knife should move as a unit in a single, smooth motion. Also, keep your elbow close to your body to provide more leverage and control.
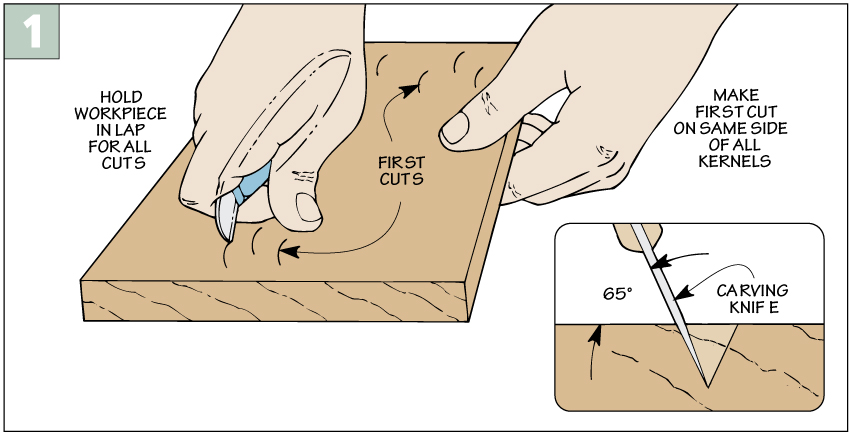
V-Groove. As the blade slices into the wood, it creates the first part of an angled cut that will eventually form a V-shaped groove (Figure 1 detail). That’s the easy part. The trick is to make a second cut that meets it at the bottom of the groove and “pops” the chip out of the wood (Figure 2 detail).
The key to producing a crisp, clean kernel is to make each cut the same depth. The wider the chip, the deeper the cut. Also, to avoid leaving a rough surface, try not to go back over a cut you’ve already made.
Cutting Sequence – I know, it sounds like there’s a lot to keep track of. But it only takes awhile to develop a knack for it, especially if you follow a basic cutting sequence. Start by carving one side of all the kernels (Figure 1). Then turn the workpiece end for end and cut the second side of each kernel (Figure 2).
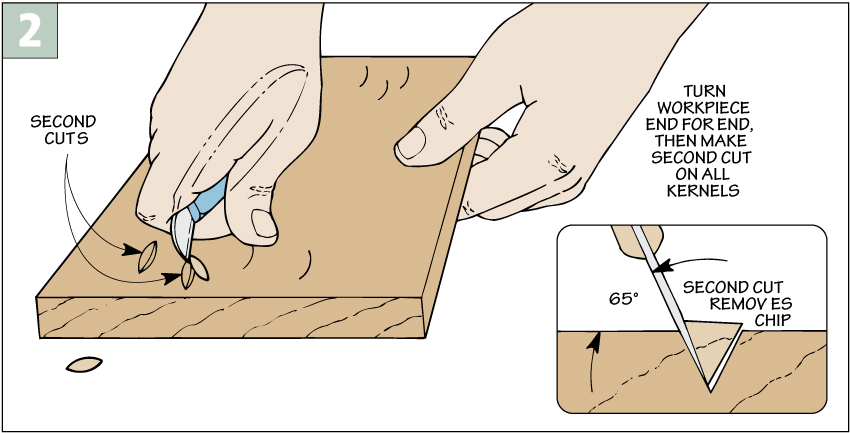 Using this sequence, you can make each cut without changing your hand position or the angle of the blade. Plus it helps establish a rhythm that makes carving the kernels as easy as eating popcorn.
 To carve each kernel of wheat, push the tip of the blade into the wood and make two slicing cuts to remove a small chip.
Carve the Handle. Once you’re satisfied with the results, it’s time to carve the “real” handle. So settle down in a comfortable chair, take your time, and start carving the individual kernels. (See photo above.) As you work, don’t worry if each kernel is perfect, or if you cut outside the lines. In fact, if the kernels are like mine, each one is just a bit different. But that’s okay. It’s all part of the beauty of chip carving.
Carving the Stems
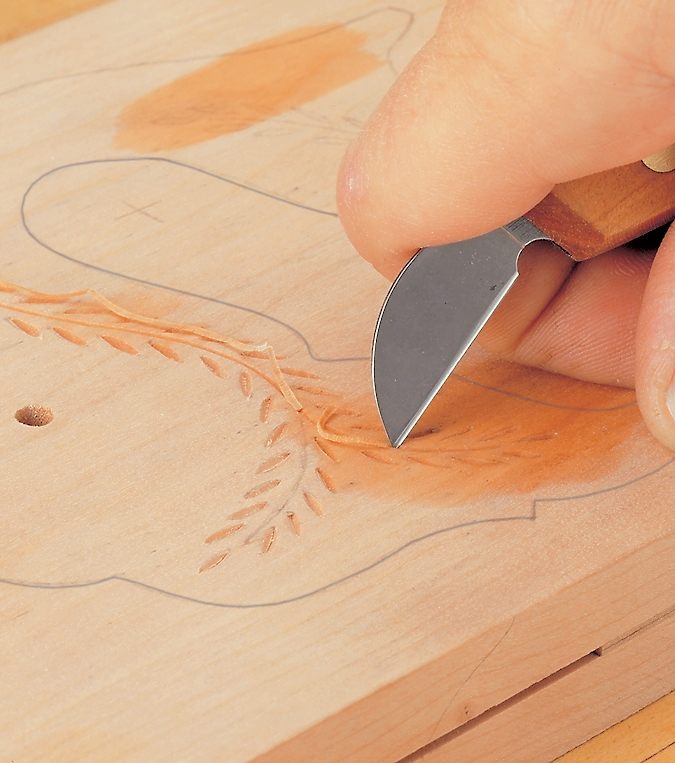 When carving the curved stems of the wheat pattern, the idea is to make two slicing cuts to remove a thin ribbon of wood.
The second part of the carving is the graceful, curved stems that run between the kernels. Carving a stem isn’t all that different from a kernel. Here again, the grip and the angle of the blade are the same. And as before, two slicing cuts form a V-shaped groove. The first cut defines the curved shape of the stem. Then, after turning the workpiece end for end, the second cut removes a thin ribbon of wood. (See photo above.)
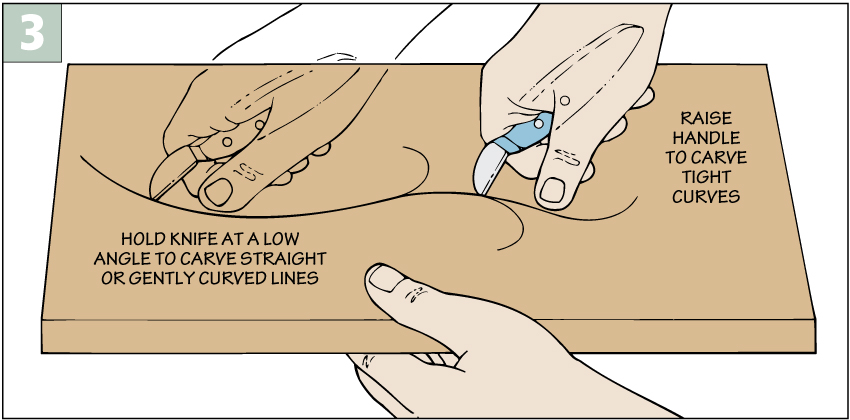
Depth of Cut. As with the kernels, the goal is to make both cuts the same depth. But since the stems are quite narrow, you’ll only need to carve about 1⁄16" deep into the wood. Look Ahead – As you make each cut, the idea is to look ahead of where the blade is cutting. This will make it easier to follow the line and create a smooth, flowing shape.
Tight Curves. One area that may cause problems is the tight curves. As you pull the knife around the curve, the blade may start to “drag” a bit.
As you can see in Figure 3, the solution is to raise the handle slightly as you work into a tight curve. This way, only a small portion of the cutting edge is buried in the wood, so it’s easy to carve a continuous curved line.
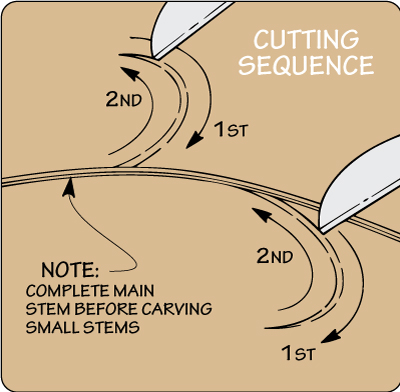
 Valleys. The “valleys” where two stems come together also need special attention. That’s because the triangular area in between may chip out.
To prevent that, I carve the main stem first. Then I plan the sequence of cuts for each short stem as shown in the detail below. The key here is the orientation of the blade where the first cut meets the main stem. Ideally, you want the cutting edge of the blade to point away from the main stem. Note: Depending on which side the short stem is on, the first cut may start or end at the main stem.
Valleys. The “valleys” where two stems come together also need special attention. That’s because the triangular area in between may chip out.
To prevent that, I carve the main stem first. Then I plan the sequence of cuts for each short stem as shown in the detail below. The key here is the orientation of the blade where the first cut meets the main stem. Ideally, you want the cutting edge of the blade to point away from the main stem. Note: Depending on which side the short stem is on, the first cut may start or end at the main stem.
 Final Details. After completing the stems, just erase any pencil marks and lightly sand the carving.
Sharpening the Blade
It only takes a few minutes to sharpen the blade on the carving knife.
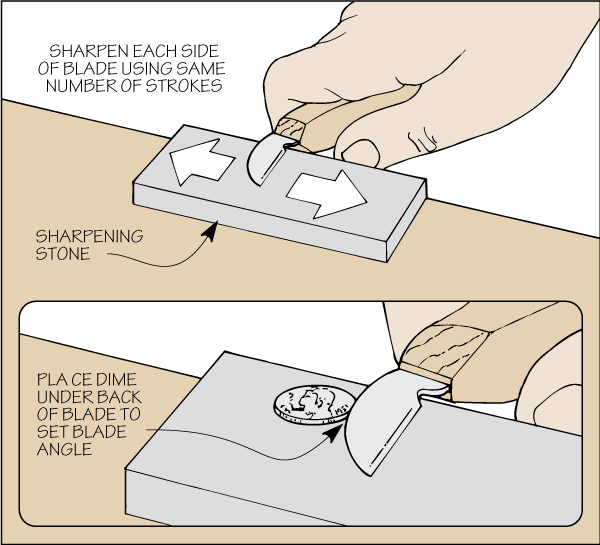
Start with the Bevel – On my knife, there’s a 10° bevel on both sides of the blade. So I try to maintain this angle as I’m sharpening. An easy way to determine this angle is to set the blade on a sharpening stone and then place a dime under the back of the blade, as shown in the detail at right. Note: I use a medium-grit ceramic stone. (For sources, see page 31.)
Once the angle is established, slide the blade back and forth on the stone, applying even pressure along the entire length of the bevel, as shown at right. You’ll want to count the number of strokes here. Then repeat the process on the other side using the same number of strokes. This ensures that the same amount of material is removed from both sides.
 Hone the Bevels. Now it’s just a matter of honing the bevels. To do this, I switch to an ultra-fine grit stone and use the same procedure to create a razor-sharp edge. Note: In a pinch, try the tip shown below.
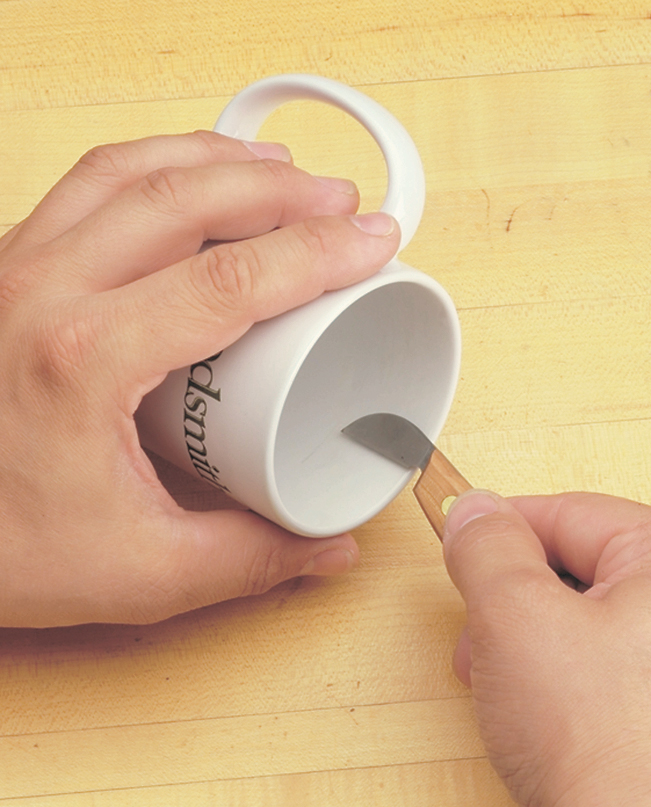 To touch up the edge of a carving knife, run it around the inside of a ceramic coffee cup.